Running Kubernetes on Microsoft Azure
This is in continuation of the Kubernetes article series. In the earlier posts, we have seen how to create & deploy a simple cluster. Now in this post, we are going to look at recently launched offerings from Microsoft Azure.
Azure Kubernetes Service (AKS) is managed Kubernetes offering from Azure. As a hosted Kubernetes service, Azure handles all heavy lifting of all the complexity, the operational overhead of managing a Kubernetes cluster for you.
As a managed Kubernetes service, AKS provides:
- Automated Kubernetes version upgrades and patching
- Easy cluster scaling
- Self-healing hosted control plane (masters)
- Cost savings – pay only for running agent pool nodes
In short, AKS would provide a container hosting environment by using open-source tools and technologies. To this end, standard Kubernetes API standard endpoints are exposed and you can leverage any software that is capable of talking to a Kubernetes cluster. Like for example,kubectl
Now we can see how to create a simple cluster using AKS.
Running Kubernetes on Microsoft Azure
This quickstart assumes a basic understanding of Kubernetes concepts, please refer earlier posts for understanding on Kubernetes & how to create, deploy & rollout updates to the cluster.
Quick Snapshot
Step#1.Launch Azure Cloud Shell
Once you login to Azure Portal, on the upper right corner, there is an option to Azure Cloud Shell. Azure Cloud Shell is a free Bash shell that has the Azure CLI preinstalled and configured to use with your account. Learn more about Azure Migration Services and Azure Windows Virtual Desktop.


Step#2.Enable AKS Preview
From the Azure Shell, enable AKS preview by the below command.
az provider register -n Microsoft.ContainerService

On the registrationState the field you can see that its ‘Registering’, you can check the status of the registration by the following command.
az provider show -n Microsoft.ContainerService

Once registration is complete, we are now ready to create a Kubernetes cluster with AKS.
Step#3.Resource group creation
Before we create the cluster & nodes, we would need to create an Azure resource group which is nothing but a logical group in which Azure resources are deployed and managed.
Create new resources using the below command.
az group create --name k8SResourceGroup --location westus2

Before proceeding to the next step, check the provisioningState on the output. It should be “Succeeded”
Step#4.Kubernetes cluster creation
Create a sample cluster named myK8sCluster with one node.
az aks create --resource-group k8SResourceGroup --name myK8sCluster --node-count 1 --generate-ssh-keys

The above command would take some time to create the cluster, once the command completes and returns JSON-formatted information about the cluster.


Step#5.Connect to Kubernetes cluster
For us to connect, manage the Kubernetes cluster, we are going to use kubectl, the Kubernetes command-line client. Azure cloud shell has already built-in kubectl so we don’t have to install them separately.
To configure kubectl to connect to our Kubernetes cluster, run the following command. This step downloads credentials and configures the Kubernetes CLI to use them.
az aks get-credentials --resource-group k8SResourceGroup --name myK8sCluster

To verify kubectl configuration, check the version of kubectl

Step#6. Deploy the new application on the cluster
Now we are going to create new Kubernetes manifest file that defines the desired state for the cluster, including what container images should be running etc.,
Create a file named Deployment.yml, you can use vi editor to create this file.

apiVersion: apps/v1beta1
kind: Deployment
metadata:
  name: nginx-deployment
spec:
  replicas: 1
  template:
    metadata:
      labels:
        app: nginx
    spec:
      containers:
      - name: nginx
        image: nginx:latest
        ports:
        - containerPort: 80
Use the kubectl create command to deploy the application.

In this example:
- A Deployment named nginx-deployment is created, indicated by the metadata: name field.
- The Deployment creates 1 replicated Pods, indicated by the replicas field.
- The Pod template’s specification, or template: spec field, indicates that the Pods run one container, nginx, which runs the nginx Docker Hub latest image (you can also specify the version ex.1.7.9.)
- The Deployment opens port 80 for use by the Pods.
Now that deployment is created, let’s check the deployment information using kubectl get deployment command :

When you inspect the Deployments in your cluster, the following fields are displayed:
NAMElists the names of the Deployments in the cluster.DESIREDdisplays the desired number of replicas of the application, which you define when you create the Deployment. This is the desired state.CURRENTdisplays how many replicas are currently running.UP-TO-DATEdisplays the number of replicas that have been updated to achieve the desired state.AVAILABLEdisplays how many replicas of the application are available to your users.AGEdisplays the amount of time that the application has been running.
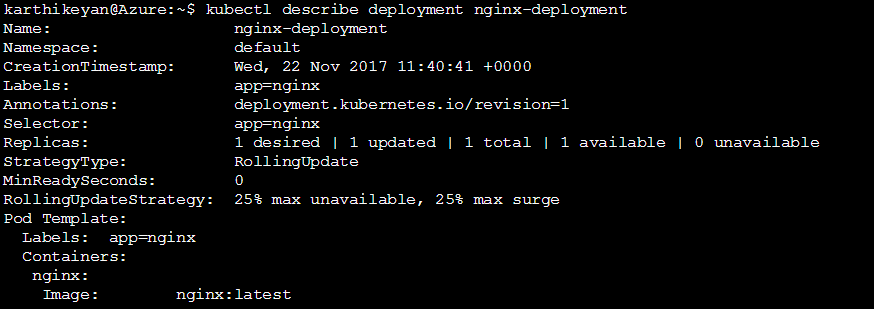
Describe the deployment using kubectl describe deployment command to check the details on the deployment.
Step#7. Create service
Kubernetes Service is an abstraction that defines a logical set of Pods and a policy by which to access them (micro-service). The set of Pods targeted by a Service is determined by a Label Selector
Kubernetes has powerful networking capabilities that control how applications communicate. These networking configurations can also be controlled via YAML. The Service selects all applications with the label Nginx. As multiple replicas, or instances, are deployed, they will be automatically load-balanced based on this common label. The Service makes the application available via a NodePort.
Create a new file named svc.yml to define load balancers & apps.

apiVersion: v1
kind: Service
metadata:
 name: nginx-svc
 labels:
 app: nginx
spec:
 type: LoadBalancer
 ports:
 - port: 80
 selector:
 app: nginx
Use kubectl create command to create a new service based on the svc.yaml file created in the previous step.

Once the External-IP is available, we can browse the Nginx page.


Image – Nginx landing page
Step#8. Clean up
Finally, now its time to clean up the resources what we have created:
kubectl delete service my-nginxkubectl delete deployment my-nginx


Like this post? Don’t forget to share it!
Additional Resources :
- Azure CLI commands
- Kubectl cheat sheet
- Take a free course on Building Scalable Java Microservices with Spring Boot and Spring Cloud
- Kubernetes tutorial – Create simple cluster & Deploy app
- Kubernetes tutorial – Scale & perform updates to your app
- Kubernetes tutorial – Create deployments using YAML file
- 10 BEST Kubernetes monitoring tools
- Managed Kubernetes Platforms Comparison: GKE vs AKS vs EKS
- Kubernetes Tutorial : Distributed tracing with Jaeger
Summary
Article Name
Running Kubernetes on Azure
DescriptionIn this post,we are going to learn about managed Kubernetes offering from Azure (AKS) & also on how to create simple application deployment.
Author
Karthik
Publisher Name
upnxtblog
Publisher Logo

More Stories
Gateway API vs. Ingress API in Kubernetes: A Modern Approach to Traffic Management
Introduction As Kubernetes continues to evolve, so does the need for more flexible and extensible methods for managing traffic into...
Minimum Viable Product (MVP) Development: A Startup’s Roadmap to Success
In today’s fast-paced tech ecosystem, startups often face one major challenge: how to launch a product quickly, efficiently, and with...
How to Secure Your APIs: A Step-by-Step Guide
If you are software programming in the era of ‘digital first’, APIs (Application Programming Interfaces) are essential. They support various...
Developing a Strong Disaster Recovery Plan for Your Business
Operating a business often entails balancing tight schedules, evolving market dynamics, and shifting consumer requirements. Equally important, though, is ensuring...
Effective Sales Strategies for Marketing SaaS Products
SaaS (Software-as-a-Service) solutions are becoming an increasingly important investment for modern organizations looking for more flexibility and scalability in their...
Trends in Metaverse Development Platforms: Choosing the Right Platform for Your Project
The launch of VisionPro and the ongoing buzz of the Metaverse smart-glass launch are paving the way for future internet...
Average Rating